Below Zero, Before the Bell: A Ten-Minute Frost and Bubble Expedition
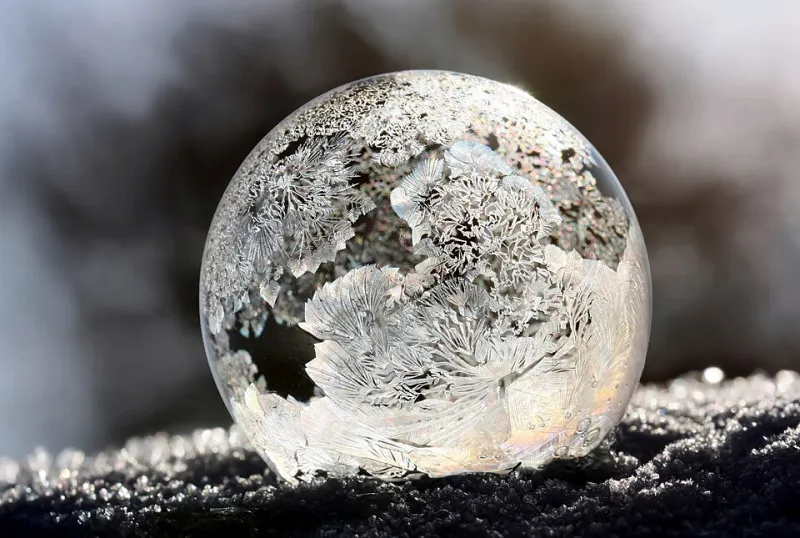
Photo: Daniela Rapavá, CC BY-SA 4.0, via Wikimedia Commons
A cold snap often arrives quietly. The forecast says minus two, the path is gritty with salt, and the car windscreen has turned into a map of white ferns. Before the school run warms the glass, there is a ten-minute science lesson waiting outside. It needs a bubble wand, a piece of dark card, a phone camera and a grown-up who is willing to stand still in the cold.
The ten-minute protocol
Check the forecast first. This works best on a clear morning when the temperature is at or below freezing. Dress for the cold: coat, gloves, hat, warm shoes. Choose a safe spot away from traffic and icy slopes. A back garden, a quiet playground edge or a school field path is ideal. Set a timer for ten minutes. The point is a quick observation, not an endurance test.
Kit: small bottle of bubble mixture, wand, dark card or black paper, camera or phone, pencil and notebook. Keep the camera in a warm pocket between shots if the battery drains quickly in the cold.
Safety: never touch a frozen metal surface with wet hands or a tongue. Do not blow bubbles near steps or roads. Watch for black ice. Keep bubble mixture away from eyes and mouths. An adult should supervise the whole expedition. If fingers go numb, go inside. The science will wait.
Station one: bubbles below freezing
Blow a bubble slowly onto a cold surface, such as a dark card laid on a wall or a patch of frosty grass. In very cold air, the thin film of water begins to freeze. You may see white crystals spreading across the bubble like tiny branches. Sometimes the bubble collapses; sometimes it holds a fragile shell for a few seconds. Both are useful observations.
The bubble film is mostly water with a little soap. Soap lowers the surface tension so the film can stretch. When the temperature drops, the water molecules begin to lock into an ice lattice. The crystals grow outward from tiny nucleation points, often at the rim or across a thin patch. If the bubble is very small, the film may freeze too quickly to watch. If it is too big, it may pop before crystals appear. Try three sizes and note which works best.
Do not expect a perfect snow-globe bubble every time. Cold-snap science is partly a game of patience. A failed bubble is still data: it tells you the air was too warm, the film too thin, or the wind too strong.
Station two: frost ferns on dark card
Frost ferns are ice crystals that grow when water vapour in the air turns directly into solid ice on a cold surface. This is called deposition. The patterns often look like feathers, ferns or tiny window trees. To catch them, place a piece of dark card in a cold, sheltered spot for a few minutes. A freezer shelf works too, if you are quick and careful. Bring it out and breathe gently across the surface. The warm, moist breath can encourage crystals to form, though the result is delicate.
Photograph the card against a plain background. Use a macro setting if your phone has one. Record the time, temperature and where the card was placed. If the crystals disappear as you watch, that is melting: solid ice turning back to liquid water. If they seem to vanish without a puddle, they may have sublimated, turning straight back to vapour. Both are states-of-matter stories.
Station three: window frost before the school run
Window frost is the most familiar frost fern of all. It forms on cold glass when humid air inside meets a surface below freezing. The patterns are built from ice crystals that grow along tiny scratches and dust particles. Photograph them before the heating comes on or the car defroster gets to work. A dark cloth behind the glass can make the white patterns easier to see.
Compare two windows: one in a kitchen where a kettle has boiled, and one in a cooler hallway. Which has more frost? Which patterns are larger? Do not touch the glass if it is very cold, and do not use hot water to clear it, as sudden temperature changes can crack glass. Use a proper scraper and the car's demister.
Turning the expedition into classroom science
Back in class, the expedition links neatly to states of matter. Water can be a gas, a liquid or a solid. The bubble film is liquid water stretched thin. The frost fern is solid ice grown from vapour. The melting puddle is liquid water again. Draw a simple three-box diagram and add arrows for freezing, melting, evaporation and deposition.
Pupils can compare photographs and look for repeated shapes. Are the crystals branching? Are they needle-like? Do they prefer edges or centres? This is pattern-seeking, a core science skill. The class can also discuss why salt melts ice on the path, and why frost forms on some surfaces but not others.
A small cold-snap habit
The best thing about this micro-expedition is that it turns an ordinary school morning into a noticing habit. Ten minutes outside, three small observations, one photograph. The cold snap does not need to be dramatic. A single frozen bubble or a fern on the car window is enough to remind everyone that states of matter are not just diagrams in a book. They are happening on the pavement, before the bell.